# 树形控件
# 介绍
树形控件它是一个拥有多个子级的菜单,子级自身也可以是菜单,理论上可以无限制的迭代循环,但一般最多渲染到第三层。

# 原理
在 一级菜单 至 子选项 时,组件直接按照传入数据进行渲染。在出现 二级菜单 以至 更多的 子选项/子菜单 时,可使用 递归 去渲染他。
# 实现
TIP
本文以 vue3 示例。
# Tree
接收一个Array类型的列表,迭代每个数组元素,渲染其中的属性值。
- 第一层级 将渲染
item.title - 如果
item有子节点children,递归自身
# 全局挂载节点
vue3中的全局挂载将由Vue.prototype.xxxx改为app.config.globalProperties.xxxx,其中app是由createApp(视图组件)所造出的实例。用于 存储默认展开节点
import global from "@/utils/global";
const app = createApp(App)
app.config.globalProperties.$global = global;
// @/utils/global.ts
const nodes = ['1', '1-1', '1-1-2', '1-2-2','2','3']

export default {
  nodes
}
# 主体部分
WARNING
vue3的获取全局变量需要引入getCurrentInstance,
取得其中的proxy,proxy可以看作vue2中的this。
<script setup>
import { ref, reactive, defineProps, getCurrentInstance, computed } from "vue";
import RightArrowImg from "@/assets/right-arrow.png";
import DownArrowImg from "@/assets/down-arrow.png";
import "./style.scss";

const { proxy } = getCurrentInstance();
const $global = proxy.$global;

const showChildren = ref(true); // 是否展开目录

// 获取父级传入的属性
const Props = defineProps({
  list: {
    type: Array,
    default: () => [],
  },
});

// 通过event事件,获取各个状态
const clickbox = (e) => {
  const checked = e.target.checked;
  const key = e.target.name;
  const nodes = $global.nodes;
  if (checked) {
    if (!nodes.includes(key)) {
      $global.nodes.push(key);
    }
  } else {
    $global.nodes = nodes.filter((item) => {
      return key !== item;
    });
  }
};

// 是否显示子元素
const changeShow = () => {
  showChildren.value = !showChildren.value;
};

// 根据全局变量中的Nodes,决定是否展开。
// 这里也可以通过mock模拟后端数据。
const isChecked = (key) => {
  return $global.nodes.includes(key);
};
</script>


<template>
  <ul class="ul-wrapper">
    <li v-for="item in list" :key="item.key">
      <div>
        <img
          class="icon"
          v-show="item.children"
          @click="changeShow"
          :src="showChildren ? DownArrowImg : RightArrowImg"
        />

        <input
          type="checkbox"
          :name="item.key"
          @click="clickbox"
          :checked="isChecked(item.key)"
          :disabled="item.disabled"
        />
        <div class="checkbox-title">{{ item.title }}</div>
      </div>
      <tree v-if="showChildren" :list="item.children"></tree>
    </li>
  </ul>
</template>
# 完善UI
<style lang="scss">
.ul-wrapper {
  // ul包裹层
  margin: 10px 0;
  width: 100px;
  list-style: none;
  padding-left: 25px;

  // 图标垂直居中
  .checkbox-title,
  .icon {
    display: inline-block;
    vertical-align: middle;
  }

  // 图标向左移动20px
  .icon {
    margin-left: -20px;
    height: 18px;
    width: 18px;
  }
}

// CheckBox样式修改
input[type="checkbox"] {
  position: relative;
  display: inline-block;
  vertical-align: middle;
  padding: 0;
  margin-right: 5px;
  height: 18px;
  width: 18px;
  border: 1px solid #ccc;
  border-radius: 3px;
}

// CheckBox选中状态时样式修改
input[type="checkbox"]:checked::before {
  position: absolute;
  top: 0;
  left: 0;
  padding-left: 4px;
  content: "✔";
  height: 17px;
  width: 13px;
  font-size: 12px;
  font-weight: bold;
  background: #1296db;
  color: #fff;
  border-radius: 3px;
  border: 0;
}

// CheckBox禁用状态时样式修改
input[type="checkbox"]:disabled::before {
  position: absolute;
  top: 0;
  left: 0;
  padding-left: 4px;
  content: "";
  height: 17px;
  width: 13px;
  font-size: 12px;
  font-weight: bold;
  background: #ccc;
  color: #fff;
  border-radius: 3px;
  border: 0;
}
</style>
# 示例图
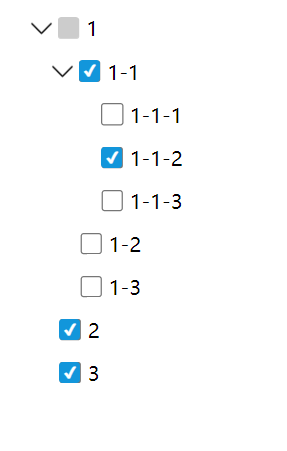
# 问题衍生
可以看到示例图中的,菜单"1"的状态是disabled,但是它的子选项确是 可选状态。 通常情况下,应该由后端将数据都做好,但以防万一,这边前端也做一下判断。
# 递归深层修改disabled值
- 迭代
list中的每个项,都做一次 禁用校验 - 每一项存在子项,则每个子项做一次 禁用校验
- 禁用校验返回值为 子项本身 (即递归返回)
// 模拟数据
const list = [
    {
        title: "1",
        key: "1",
        disabled: true,
        children: [
            {
                title: "1-1",
                key: "1-1",
                disabled: false,
                children: [
                    {
                        title: "1-1-1",
                        key: "1-1-1",
                        disabled: false,
                    },
                    {
                        title: "1-1-2",
                        key: "1-1-2",
                        disabled: false,
                    },
                    {
                        title: "1-1-3",
                        key: "1-1-3",
                        disabled: false,
                    },
                ],
            },
            {
                title: "1-2",
                key: "1-2",
                disabled: false,
            },
            {
                title: "1-3",
                key: "1-3",
                disabled: false,
            },
        ],
    },
    {
        title: "2",
        key: "2",
        disabled: false,
    },
    {
        title: "3",
        key: "3",
        disabled: false,
    },
];

// 更新列表
function updatedList(data) {
    // 对每一个子项都执行禁用校验
    return data.map(item => {
        if (item.disabled === true && item.children) {
            item.children = setChildrenDisabled(item);
        }
        return item;
    })
}

// 设置子选项为禁用
function setChildrenDisabled(obj) {
    if (!obj.children) return;

    return obj.children.map(item => {
        item.disabled = true;

        // 递归并将结果返回给子项
        item.children && (item.children = setChildrenDisabled(item));
        return item;
    })

}

const result = modifyDisabled(list);
console.log("result",result);
# 应用至主页
// 更新列表
function updatedList(data) {
    // 对每一个子项都执行禁用校验
    return data.map(item => {
        if (item.disabled === true && item.children) {
            item.children = setChildrenDisabled(item);
        }
        return item;
    })
}

// 设置子选项为禁用
function setChildrenDisabled(obj) {
    if (!obj.children) return;

    return obj.children.map(item => {
        item.disabled = true;

        // 递归并将结果返回给子项
        item.children && (item.children = setChildrenDisabled(item));
        return item;
    })

}

// 页面初始化,获取数据,并作禁用校验
(function getData() {
  treeData.value = updatedList( [
    {
      title: "1",
      key: "1",
      disabled: true,
      children: [
        {
          title: "1-1",
          key: "1-1",
          disabled: false,
          children: [
            {
              title: "1-1-1",
              key: "1-1-1",
              disabled: false,
            },
            {
              title: "1-1-2",
              key: "1-1-2",
              disabled: false,
            },
            {
              title: "1-1-3",
              key: "1-1-3",
              disabled: false,
            },
          ],
        },
        {
          title: "1-2",
          key: "1-2",
          disabled: false,
        },
        {
          title: "1-3",
          key: "1-3",
          disabled: false,
        },
      ],
    },
    {
      title: "2",
      key: "2",
      disabled: false,
    },
    {
      title: "3",
      key: "3",
      disabled: false,
    },
  ]);
})();
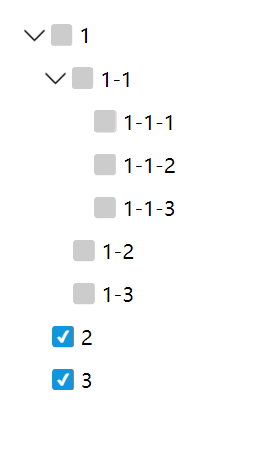
# 修改后的示例图
# 总结
- vue3的全局变量转变为了
app.config.globalProperties - vue3引入全局变量的方式为
import { getCurrentInstance } from 'vue',const { proxy } = getCurrentInstance() - 渲染深层次的节点 或者 修改深层的值 都需要使用到 递归
# 参考文章
← 弹框组件的实现 项目中的电子签名组件 →